
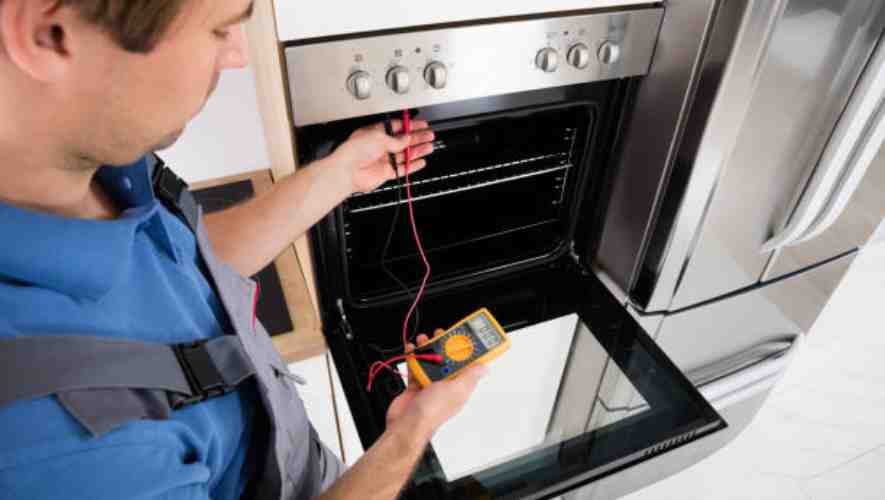
When your microwave starts acting up, testing the high voltage diode might be a smart move. This component is crucial because it directs current in one direction, ensuring your microwave operates smoothly. If you suspect issues, an easy test with a multimeter can tell you whether the diode is good or if it needs a replacement. First things first, make sure to unplug your microwave to avoid any shocks. Then, access the side of the diode by removing the microwave’s cover. You’ll also want to check the high voltage capacitor to make sure it doesn’t hold any residual charge—just touch each terminal with the multimeter probes to confirm there’s no current.
How to Test a Microwave Oven Diode? To test a microwave oven diode, use a multimeter set to the high-resistance setting. Disconnect the diode from the microwave, attach the multimeter probes to the diode terminals, and check for continuity in one direction only. Reverse the probes; no continuity should be detected.
To test the diode, set your multimeter to the DC high voltage setting and check for continuity in both directions. A functioning diode will show current flow in only one direction (positive to negative). If you find that the current flows in reverse or the diode is open (no continuity in either direction), it’s time to think about a replacement. Remember, handling these components requires caution due to the risk of enough voltage remaining in the capacitor. So, take your time, follow these directions, and you’ll have a clear idea if a repair or a new part is needed for your microwave oven.
Quick and Easy Steps to Test a Microwave Diode

Gather Your Tools
Before you dive into testing the microwave diode, make sure you have all the necessary tools on hand. You’ll need a multimeter capable of testing resistance and a screwdriver to open the microwave cabinet. It’s also a good idea to have a pair of safety gloves and eye protection, since you’ll be dealing with electrical components.
Safety First: Unplug and Discharge
Always start by unplugging your microwave from the power source. This is crucial to avoid any electrical shocks. Next, you’ll need to discharge the high-voltage capacitor to safely test and handle the diode. You can do this by carefully placing a screwdriver with an insulated handle across the capacitor’s terminals. You might hear a loud ‘click’ as the charge is released—don’t worry, this is normal.
Access the Diode
Open the microwave’s cabinet using your screwdriver. The diode is usually attached near the capacitor. It’s important to note the orientation of the cathode and anode for testing and potential replacement. The cathode is typically marked with a stripe and is the side that should show continuity when tested.
Test the Diode
Set your multimeter to the resistance setting. Attach the multimeter’s leads to the diode—positive lead to the anode and negative to the cathode. A functioning high-voltage diode will only show continuity in one direction (from anode to cathode). If you reverse the leads, the multimeter should not indicate any continuity. If it does, or if there is no continuity in either direction, the diode is likely defective and will need to be replaced.
Checking for a Burnt Diode
Sometimes, physical inspection can reveal if a diode is burnt or defective. Look for any signs of burning or damage on the diode itself. This can often save you time before you even start testing with a multimeter.
Replace if Necessary
If your tests indicate that the diode is defective, you’ll need a replacement microwave diode with the same model number as the original. Ensure that the replacement part matches exactly to avoid any further issues. Attach the new diode by aligning it in the same position as the old one, making sure the cathode and anode are correctly oriented.
Final Steps
Once the new diode is in place, reassemble your microwave and plug it back in. Give it a test run with a cup of water inside to see if it heats up correctly. If everything works as it should, congratulations on a successful microwave repair!
Conclusion
In wrapping up, keeping your microwave in tip-top condition is more than just a maintenance task—it’s a step towards enhancing your entire cooking experience. By understanding how to identify and resolve common issues like a defective diode, you’re not only saving on potential repair costs but also ensuring that your microwave performs optimally. This appliance, much like your refrigerator or any kitchen transformer, is central to modern culinary routines, helping you whip up quick recipes and clever kitchen hacks.
Remember, the performance of your microwave might depend on seemingly small components, but each plays a critical role in its overall functionality. Whether it’s heating up leftovers or helping you explore new recipes, a well-maintained microwave can display its worth daily. And while you might not need to use a nine-volt battery or deal with the opposite ends of typical kitchen tasks, keeping your microwave in good working order ensures that it’s ready to assist whenever you need it.
Frequently Asked Questions (How to Test a Microwave Oven Diode)
How do I know if my microwave diode is bad?
To determine if your microwave diode is faulty, look for signs like a humming noise when running, the microwave not heating food, or visible damage to the diode. A multimeter test showing no continuity also confirms a bad diode.
How do you test a microwave diode with a digital multimeter?
To test a microwave diode with a digital multimeter, set the multimeter to the highest resistance setting. Connect the multimeter’s positive lead to the diode’s anode and the negative lead to the cathode. A good diode will show high resistance in one direction and low in the reverse.
What is the voltage of a microwave diode?
The voltage of a microwave diode typically ranges from around 12 kV (12,000 volts) for household units to higher values for commercial models. It’s designed to withstand high voltages while allowing the microwave to generate the electromagnetic waves needed for cooking.
What are the symptoms of a bad diode?
Symptoms of a bad diode include electrical components not charging properly, a battery that drains quickly, flickering lights, and unusual noises from the alternator. These issues result from the diode’s failure to regulate electrical flow correctly.
